


Table of contents
The following article is the first in a series of articles that will help you build a DAO on the Flow network using Cadence.
Testing smart contracts is one of the most important measures for improving smart contract security. Smart contract testing means performing a detailed analysis and evaluation of a smart contract to assess the quality of its source code during the development cycle. Testing a smart contract makes it easier to identify bugs and vulnerabilities and reduces the possibility of software errors that could lead to costly exploits.
In this article you will learn how to test Cadence smart contracts using Overflow; a DSL written in golang to be used in tests or to run a story of interactions against either a local emulator, testnet, mainnet, or an in-memory instance of the flow-emulator. It’s actually a pretty simple tool; you don’t need to learn any Golang to use it!
Setting up the testing environment
The first thing we’re going to do is create testing directory with mkdir blockversity-overflow && cd blockversity-overflow. Then we will initiate the flow environment with flow init.
Then we initiate the go module and install overflow in it. Here’s the example bash code(replace “blockversity/dao-overflow” with your file name):
go mod init blockversity/dao-overflowgo getgithub.com/bjartek/overflow
You should se a bunch of notifications in your terminal that look like
> `go: added [cloud.google.com/go](http://cloud.google.com/go) v0.104.0`

> `go: added [cloud.google.com/go/compute](http://cloud.google.com/go/compute) v1.12`
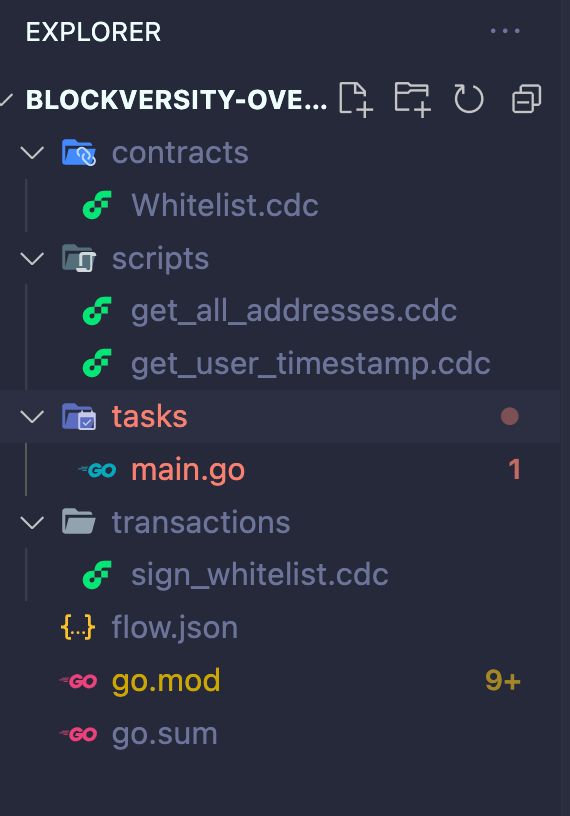
Then we create a task directory typing mkdir tasks && cd tasks, and inside it we create the main go file with touch main.go. Now, before adding anything to this file, we’ll import the cadence smart contracts, scripts, and transactions folders that we want to test.
For this example, I’ll use the same Whitelist contract, scripts, and transactions created in this article. It’s a pretty simple contract that allows a user to sign with their account and be added to a DAO’s whitelist. Only this time, they’re adapted to work with the file system and not with the Flow playground.
Sign Whitelist Transaction
Get addresses Script
Get timestamp Script
Your root directory should look something like:
The last step to be completed in order to have a ready-to-go setup is importing the contract to the flow.json and add the emulator accounts. To save you time, simply delete everything inside your flow.json and paste this in it:
{
 "emulators": {
  "default": {
   "port": 3569,
   "serviceAccount": "emulator-account"
  }
 },
 "contracts": {
  "Whitelist": "./contracts/Whitelist.cdc"
 },
 "networks": {
  "emulator": "127.0.0.1:3569"
 },
 "accounts": {
  "emulator-account": {
   "address": "f8d6e0586b0a20c7",
   "key": "dc0097a6b58533e56af78c955e7b0c0f386b5f44f22b75c390beab7fcb1af13f"
  },
  "emulator-alice": {
   "address": "0x01cf0e2f2f715450",
   "key": "1a05ba433be5af2988e814d1e4fa08f1574140e6cb5649a861cc6377718c51be"
  },
  "emulator-bob": {
   "address": "0x179b6b1cb6755e31",
   "key": "1a05ba433be5af2988e814d1e4fa08f1574140e6cb5649a861cc6377718c51be"
  }
 },
 "deployments": {
  "emulator": {
   "emulator-account": [
    "Whitelist"
   ],
   "emulator-bob": [],
   "emulator-alice": []
  }
 }
}
This is telling the emulator to import the Whitelist contract from contracts, create the emulator Alice and Bob with their respective accounts and private keys, and then deploy these three together when the Emulator starts to run.
And with that, we’re ready to start testing.
Overflow Simple Operations
In that task file, you can then import overflow and use it to your convenience. Let’s run a couple of transactions with it. Running a transaction in overflow is done by calling the Tx method on the o or overflow object.
package main

import (

 "fmt"
 //if you imports this with .  you do not have to repeat overflow everywhere
 . "github.com/bjartek/overflow"
 "github.com/fatih/color"
)

func main() {

 //start an in memory emulator by default
 o := Overflow(
  WithGlobalPrintOptions(),
 )

 fmt.Println("Testing Contract")
 fmt.Println("Press any key to continue")
 fmt.Scanln()
 /*
  Add an address to the Whitelist
 */
 color.Red("Should be able to sign Bob's and Alice's addresses into the Whitelist.")
 o.Tx(
  "./sign_whitelist",
  WithSigner("bob"),
 )
 o.Tx(
  "./sign_whitelist",
  WithSigner("alice"),
 )
 color.Green("-----------------------------PASSED---------------------")
}
This will run the transaction sign_whitelist from the transactions/ folder, sign is as the demo user Alice. It will also print out the result in a nice terse way. Note that when we refer to users by name in overflow we do not use the network prefix, this is so that you can have the same stakeholders on mainnet/testnet if you want to without changing the code. So in flow.json the account for Alice is called ‘emulator-alice’.
From the root directory run: go run ./tasks/main.go.

Overflow provides details about the transaction and all emitted events
And et voilà! We just deployed the Whitelist contract to the emulator and had Bob and Alice sign it with a Transaction. A script is run in very much the same way as a Transaction only it uses the Script method like the following example:
 color.Red("Should be able to fetch all the signed addresses")
 o.Script(
  "./get_all_addresses",
  WithSigner("account"),
 )
 color.Green("-----------------------------PASSED---------------------")
After running go run ./tasks/main.go again we get

In your terminal you should see something like this
As you can see from the emitted events, the addresses of Bob and Alice are inside the result of running our get_all_addresses script. Now let’s run a Script with arguments this time. Most arguments in overflow are sent using the WithArg method.
 color.Red("Should be able to fetch Bob's timestamp from the Whitelist contract.")
 epoch := o.Script(
  "./get_user_timestamp",
  WithSigner("account"),
  WithArg("user", "bob"),
 ).Result
 fmt.Println("The timestamp for bob is: ", epoch)
 color.Green("-----------------------------PASSED---------------------")
The o.Script returns an object from which we can extract the Result and assign it to a variable. Running the main.go file again shall give us this result.

Bob’s timestamp after signing the Whitelist
And just like that, we were able to launch our contract to the emulator and test our scripts and transactions with it. This is the simplest way to interact with Cadence contracts using Overflow. Here’s the complete code:
package main

import (
 //if you imports this with .  you do not have to repeat overflow everywhere
 "fmt"

 . "github.com/bjartek/overflow"
 "github.com/fatih/color"
)

func main() {

 //start an in memory emulator by default
 o := Overflow(

  WithGlobalPrintOptions(),
 )

 fmt.Println("Testing Contract")
 fmt.Println("Press any key to continue")
 fmt.Scanln()
 /*
  Add an address to the Whitelist
 */
 color.Red("Should be able to sign Bob's and Alice's addresses into the Whitelist.")
 o.Tx(
  "./sign_whitelist",
  WithSigner("bob"),
 )
 o.Tx(
  "./sign_whitelist",
  WithSigner("alice"),
 )
 color.Green("-----------------------------PASSED---------------------")
 /*
  Fetch All Addresses
 */
 color.Red("Should be able to fetch all the signed addresses")
 o.Script(
  "./get_all_addresses",
  WithSigner("account"),
 )
 color.Green("-----------------------------PASSED---------------------")
 /*
  Fetch timestamp for a user.
 */
 color.Red("Should be able to fetch Bob's timestamp from the Whitelist contract.")
 epoch := o.Script(
  "./get_user_timestamp",
  WithSigner("account"),
  WithArg("user", "bob"),
 ).Result

 color.Cyan("The timestamp for bob is: ", epoch)
 color.Green("-----------------------------PASSED---------------------")
}
In the next article, there will be more complex examples of how to use the Overflow library.