

How to build a DAO on Flow
by Noah Naizir

The following Article is the first in a series of articles that will help you build a DAO on the Flow network using Cadence.
What Is a Decentralized Autonomous Organization (DAO)?
A decentralized autonomous organization (DAO) is an emerging form of legal structure that has no central governing body and whose members share a common goal to act in the best interest of the entity. Popularized through cryptocurrency enthusiasts and blockchain technology, DAOs are used to make decisions in a bottom-up management approach.
How to develop a DAO smart contract with Cadence
DAO smart contracts are used to automate processes and ensure that rules about predefined conditions are followed. They are similar to ERC20 contracts, which ensure certain rules are followed when creating and managing tokens, such as supply number and transfer details. An example of a great DAO smart contract would be a venture that deals with grants. This type of contract ensures that pools, voting for fund distribution, and distributing the funds all happen according to predefined rules.
On this first article, we’ll learn how to setup a Scaffold of a DAO website with Web3 Authentication on the Flow blockchain, with a simple Guestbook/Whitelist smart contract for those who are interested in signing in for the upcoming DAO launch. Then, we’ll have the foundation to write our own DAO Smart Contract.
Introduction to Cadence
In the fast-paced world of Web3, there is no shortage of innovative new technologies to explore. Flow was built as an alternative to slower, less user-friendly layer 1 blockchains with its own custom-built smart contract language, one that is known for how it excels in handling digital assets, such as NFTs. It was built from the ground up as a better alternative to Ethereum’s network congestion and high fee issues.
The Cadence smart contract language is a first-of-its-kind resource-oriented programming language that makes creating and managing digital assets easy and efficient. Although Solidity is excellent at facilitating Web3 through smart contracts, there are drawbacks. Cadence improves upon Solidity’s flaws by providing the ability to upgrade smart contracts and features that reduce the risk of human error, among other improvements.
This article will explain a bit about Flow’s history, unpack its smart contract language Cadence, and give examples on how to develop a small Dapp with it.
Flow’s History
In 2017, a new Ethereum collectibles game, CryptoKitties, developed by the Canadian company Dapper Labs, made headlines after it caused the Ethereum network massive congestion while only having 10,000 users. The developers at Dapper Labs quickly realized that the Ethereum network was not optimized to operate and scale a successful game, so they started working on an alternative.
The end result of Dapper Lab’s efforts is the Flow Blockchain — a decentralized and developer-friendly blockchain designed to scale without sharding. Flow is highly optimized for the creation and management of digital assets such as NFTs.
Resource-Oriented Programming
Cadence is a new smart contract language introduced by Flow’s developer team to optimize the creation and management of digital assets on the blockchain. It is the first high-level language with a strong static type system, using syntax inspired by modern programming languages. Resources, such as NFTs, are stored directly in a user’s account and the language enforces strict rules for the management of assets, reducing the risk of losing or accidentally deleting an asset due to errors in the code.
The Whitelist, a small dApp.
For the rest of this article, we will walk through the process of creating a simple dApp on the Flow blockchain.
We will start with setting up and deploying a Whitelist smart contract. Then, we will build a front end to connect to our smart contract and interact with it.
The functionality we build will allow users to connect their Flow account, create an account if they don’t already have one, then sign the Whitelist. Then, the dApp will display the Addresses of all the users that have signed it, and also the connected address will be able to read the date it signed the Whitelist. It will be an excellent project to highlight how easy it is to start developing smart contracts on Flow and how effective the Flow Client Library (FCL) is for interacting with the blockchain.
To follow along with this tutorial, you’ll need the following things:
The Flow Command Line Interface (Flow CLI)
With all of these installed, let’s get started!
Our First Smart Contract
In order to start making our first Smart Contract, we need to figure out a place to actually put it! To do that, launch a browser of your choice, go to the Flow playground by pasting in this URL: https://play.onflow.org. After you do that, do the following
1. On the left hand side, click the ‘0x01’ tab.
2. Delete everything in that page.
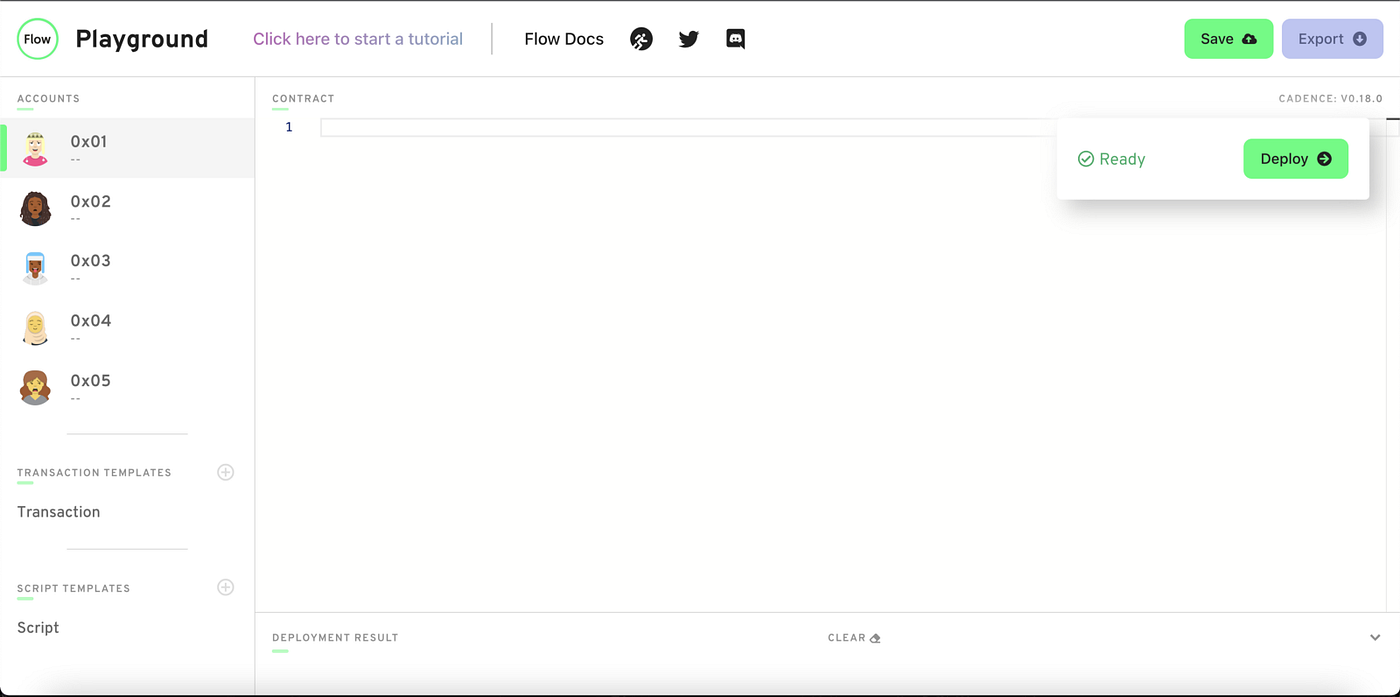
It should look like this
What we have done is clicked on the Account with address 0x01 and deleted the contract in its account. This brings up an important topic.
What’s an address?
An address is something that looks like 0x and then a bunch of random numbers and letters. Here’s an example address on Flow: 0xe5a8b7f23e8b548f. On the Flow playground, you’ll see much shorter addresses like 0x01. That’s just to make things simpler.
But what actually IS an address? Well, you can think of them as a user. When I want to do something on the blockchain, I need to have an account. Every account has an address associated with it. So when you see something like 0xe5a8b7f23e8b548f, that’s really just a person’s account that they use to store data, resources and smart contracts.
Where do smart contracts live?
Smart Contracts are deployed accounts. As we mentioned above, accounts are owned by a user, and every account has an address associated with it that always begins with 0x. In this case, since we are on the Flow playground, it has automatically given us 5 accounts, namely 0x01, 0x02, and so on. Thus, Smart Contracts live at an address. So when we deploy a contract named “Hello World” to account 0x01, that is how we identify it. If we wanted to interact with it, we would have to know both the name of the contract and the address. We’ll see this more in-depth when we import stuff later on.
Back to the Whitelist
In this case, we will be deploying our Whitelist Smart Contract to account 0x01. This means account 0x01 is the owner of this Smart Contract. In the real world, you would deploy your Smart Contract to your account, but because this is a fake-simulation world, we can choose any account we want, so we chose 0x01.
Let’s make our contract now. In the empty space, type the following:
Cadence smart contract
The pub contract [contract name] part will always be what you type when you create a new contract. You can fill in contract name with whatever you’d like to call your contract.
The init() function is a function that every single contract must have. It is called when the Contract is initially deployed, which in the real world, only ever happens one time.
And just like that, we have a smart contract on Flow. It doesn’t do anything yet, though, so let’s make it store a addressInfo variable so we can store some data in this contract.
Modify your contract code so it looks like this:
Adding public variable addressInfo
In Cadence, when you declare a variable, you follow this format:
[access modifier] [var/let] [variable name]: [type]
Using our example above…
Our access modifier is pub, which means anyone can read this variable.
var means that this variable is not a constant and can be changed. If you want to set a value that should never change, you use let instead.
Our variable name is addressInfo
The type of our variable is a Dictionary. A dictionary is something that maps a key to a value. In the above example, we mapped Addresses to UFix64s. More specifically, we mapped someone’s account’s address to the exact time they signed the Whitelist. We did this with the dictionary type, which is {Type: Type}.
Next, we put self.addressInfo = {} inside the init() function. Remember, the init() function is called when the contract is deployed, which only happens once. self is a keyword that means “the variable that is one layer above.” In this case, self.addressInfo is referring to the addressInfo variable we declared right above it, and we set it equal to an empty dictionary.
Now, we’ve defined the dictionary that will record users’ addresses, but we haven’t implemented any way to interact with it and let people actually sign it. We need a function to do this, and it should look like this:
Adding our first public function
In this example we’ve declared a public function called addAddress which takes a parameter called newAddress which is meant to be of type Address. Inside the function there’s a pre conditional; which means that the following code will only execute if certain conditions are met. In this case, the function will only run if looking into our dictionary with the newAddress returns nil which would mean that this account has never signed the Whitelist before. If it has, then the function panics and reverts the process.
Pre-conditions and post-conditions must be defined as the first thing of a function, you can’t put them in the middle or at the end. In order for a pre/post-condition to pass, the condition must be true, or else it will panic with the string after.
Now to finish up this contract we’re going to add a final element: events. Events are a way for a smart contract to communicate to the outside world that something happened.
For example, if we list an NFT for sale, we want the outside world to know that we’re selling that NFT. In our case, we want the contract to tell us when it’s been initialized and when someone signs the Whitelist.
After adding these two events, your smart contract should look like this:
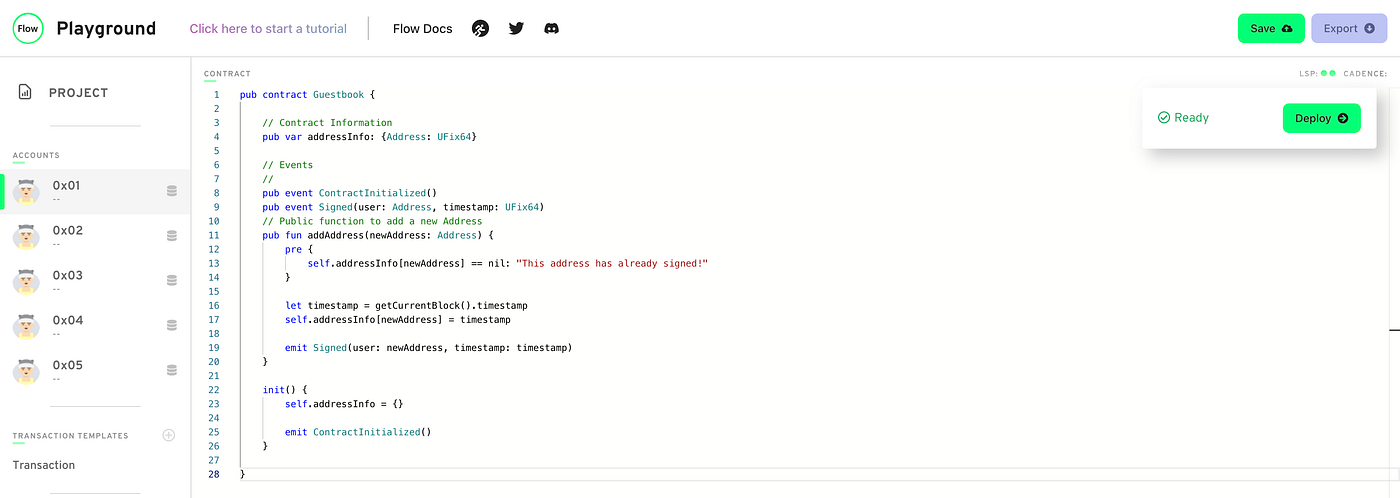
Complete Smart Contract
ContractInitialized is a universal event that signals the deployment of a new contract. On the other hand, Signed is our own personal event that will let us know when someone has signed the Whitelist and will share that account’s address and the exact date it signed the contract. Now, all we need to do is click “Deploy” to deploy this contract to the playground.
Now that our smart contract is done, we need to write scripts and transactions to interact with it. Scripts are read-only functions that allows us to view data on the blockchain, free of charge! On the left hand side, under “Script Templates”, click on the tab that says “Script” and delete everything inside of it. Next, write the following code:
Writing our first Script with Cadence
This script will allow us to read data from the contract, more specifically, it will give us the date at which a specific Address signed the contract. This is what we’re doing within it:
We’re importing the Whitelist smart contract from the 0x01 account.
We’re running a public function called main that takes an user of type Address as a parameter and may or may not return a UFix64.
We’re looking through the addressInfo dictionary for the timestamp assigned to the user and return it as a variable. If we found the timestamp, it’ll return a UFix64, if not; it will return nil.
If you run this script right now, it won’t give you any data because no one has signed yet! But how could anyone sign our Whitelist if we haven’t wrote any transactions for it? Transactions are functions that allow us to write data on the blockchain; they cost a small fee.
On the left hand side, under “Transaction Templates”, click on the tab that says “Transaction” and delete everything inside of it. Next, write the following code:
Our first Cadence transaction
There’s a few things going on here, but before I jump into that, let me explain something first:
On Flow, accounts can store their own data. What does this mean? Well, if I own an NFT (NonFungibleToken) on Flow, that NFT gets stored in my account. This is very different than other blockchains like Ethereum. On Ethereum, your NFT gets stored in the smart contract. On Flow, we actually allow accounts to store their own data themselves. But how do we access the data in their account? We can do that with the AuthAccount type. Every time a user sends a transaction, you have to pay for the transaction, and then you “sign” it. All that means is you clicked a button saying “I want to approve this transaction.” When you sign it, the transaction takes in your AuthAccount and can access the data in your account.
You can see this being done in the prepare portion of the transaction, and that’s the whole point of the prepare phase: to access the information/data in your account. On the other hand, the execute phase can’t do that. But it can call functions and do stuff to change the data on the blockchain. NOTE: In reality, you never actually need the execute phase. You could technically do everything in the prepare phase, but the code is less clear that way. It’s better to separate the logic.
In this example, what we did was very simple:
- Declare a variable called address
- Run prepare requesting the connected account to provide its AuthAccount so we can access its address
- In the execute phase, we run the addAddress function inside the Whitelist smart contract with our address variable that holds the user’s account actual address on the blockchain.
If we deploy our contract on the Playground and run the transaction using the 0x02 account, we should be able to run our script with the same account and see this message:
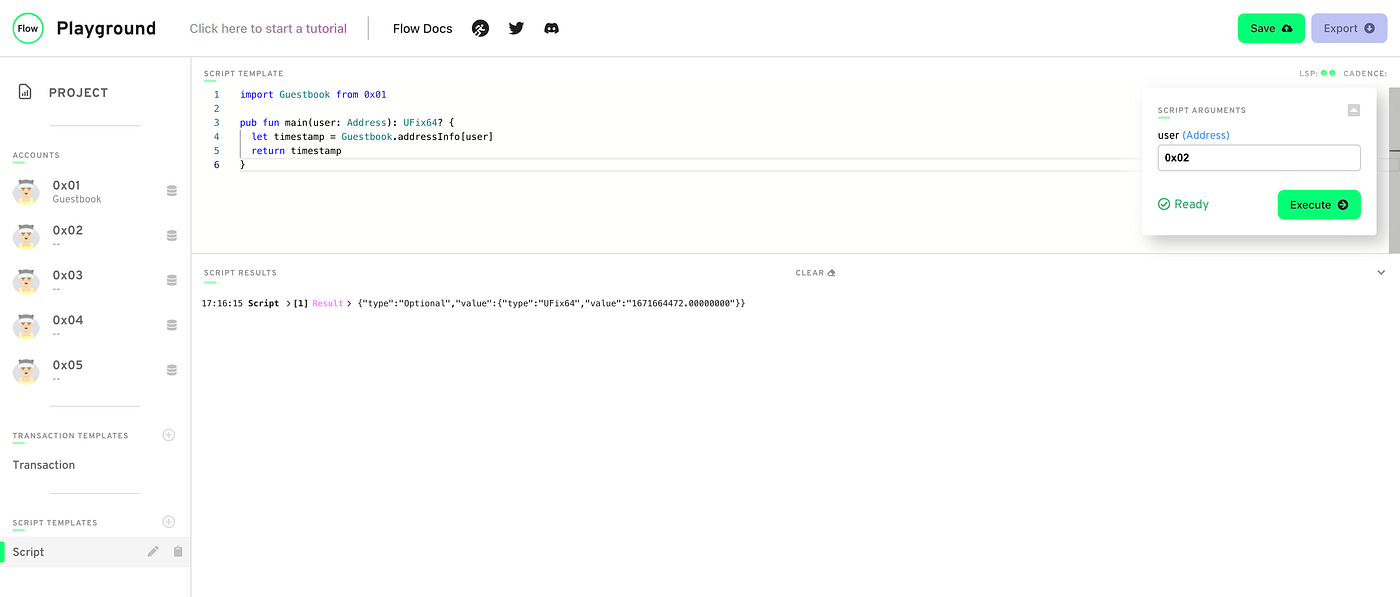
Running Script after signing the Whitelist
Congratulations! You’ve deployed your first smart contract with transactions and scripts!
Now, in real life you would like to deploy your contract in a real environment like the Mainnet or Testnet networks; the playground is nice, but there’s only so many things you can do there. It’s time to deploy our contract into the actual Flow blockchain, in this case: the Testnet network.
Installing the Cadence VSCode Extension
If you haven’t installed VSCode before, you can do that here: https://code.visualstudio.com/
Now that we’re no longer on the playground, we want to be able to have errors show up in our VSCode when we’re coding Cadence. There’s an extension to do that!
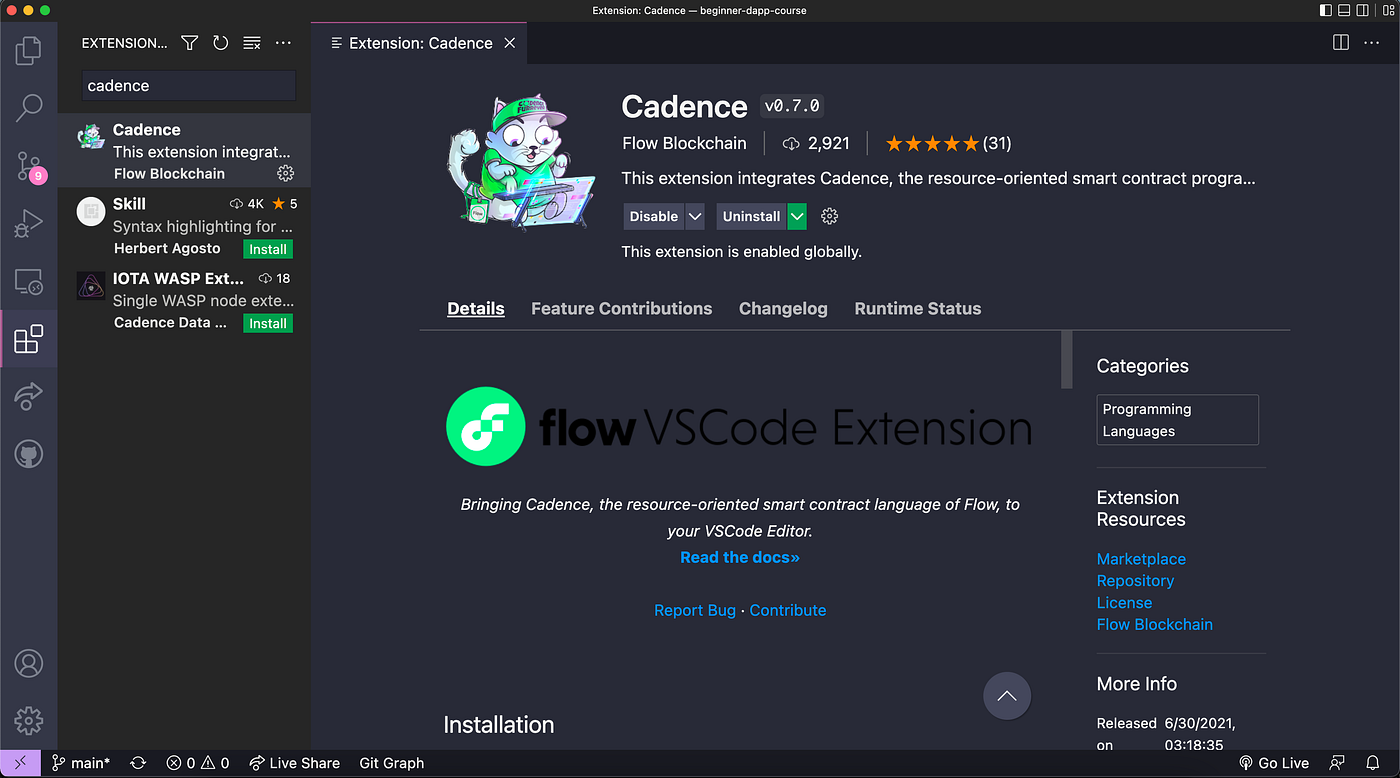
Open VSCode. On the left side of VSCode, there’s an icon that looks like 4 squares. Click that and search “Cadence”.
Click on the following extension and press “Install”:
Installing the Flow CLI & flow.json
The Flow CLI will allow us to run transactions & scripts from the terminal, and allow us to do other Flow stuff like deploying a contract.
Install the Flow CLI. You can do that by pasting the following into your terminal:
- Mac
sh -ci "$(curl -fsSL https://storage.googleapis.com/flow-cli/install.sh)"
- Windows
iex "& { $(irm 'https://storage.googleapis.com/flow-cli/install.ps1') }"
- Linux
sh -ci "$(curl -fsSL https://storage.googleapis.com/flow-cli/install.sh)"
You can confirm the Flow CLI is installed by going to a terminal and typing flow version. If a version appears, you’re good to go.
Flow Folder
Inside of our base directory, let’s make a new folder called flow.
Inside of the flow folder, let’s make another folder called cadence.
Inside of the cadence folder, let’s make a contracts folder, a transactions folder, and a scripts folder.
Inside of the contracts folder, add a new file called CONTRACT_NAME.cdc. Replace CONTRACT_NAME with the name of your contract, in this case Whitelist.cdc
Inside the scripts folder we should do the same. Import get_user_timestamp.cdc like:
Importing the Whitelist smart contract into our Script
Notice that the imports are also now all wrong. We aren’t importing from 0x01 anymore, that was just a playground thing. In this case, we are importing from a local contract that exists in our project. So change the imports to something like this format:
import Whitelist from "../contracts/Whitelist.cdc"
Inside the transactions folder, import sign_whitelist.cdc like:
Signing the Whitelist transaction
flow.json
Now that we have our contract in our project directory, go to your terminal and cd into the base project directory.
Type flow init
This will create a flow.json file inside your project. This is needed to deploy contracts and to give us compile errors inside our Cadence code.
Deploying our NFT Contract to TestNet
Now let’s deploy our contract to Testnet so that we can start interacting with it.
Configuring flow.json
Inside of your flow.json file, make the “contracts” object look like this:
"contracts": {
 "Guestbook": "./contracts/Guestbook.cdc"
},
This will allow your flow.json to know where your contracts live.
Set Up Flow Account
Before we deploy our contract, we’ll need to set up an account on the Flow blockchain. Run the following command to generate a new public and private key pair:
flow keys generate
Be sure to write down the values your console outputs, as we’ll need them in the following steps.
Next, we’ll head over to the Flow Faucet to create a new address based on our keys and fund our account with some test tokens. Complete the following steps to create your account:
1. Paste in your public key in the specified input field
2. Keep the Signature and Hash Algorithms set to default
3. Complete the captcha
4. Click on Create Account
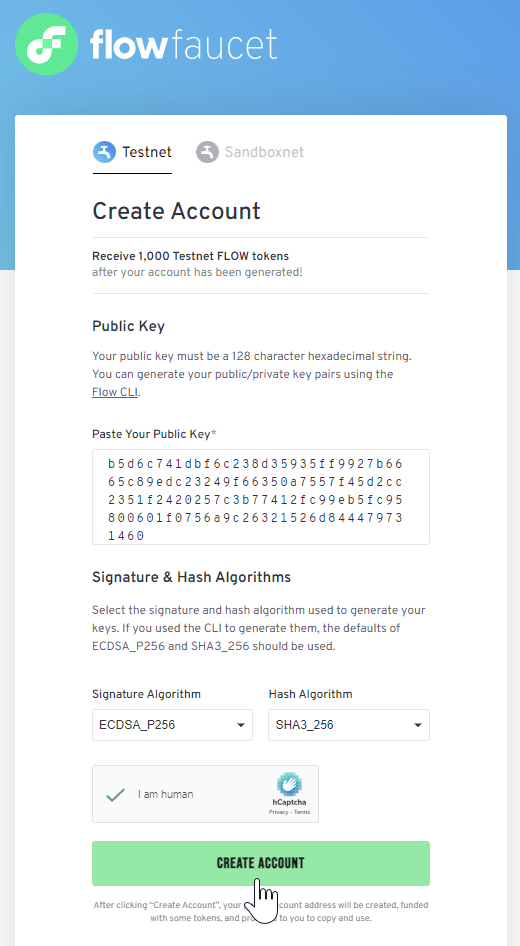
With a successful account generation, we get a dialogue with our new Flow address containing 1,000 FLOW tokens. Now we’re ready to deploy, but we need to add this account to the Flow.json file. Below ”contracts”, write the following configuration:
"accounts": {
  "emulator-account": {
    "address": "f8d6e0586b0a20c7",
    "key": "5112883de06b9576af62b9aafa7ead685fb7fb46c495039b1a83649d61bff97c"
  },
  "testnet-account": {
    "address": "YOUR GENERATED ADDRESS",
    "key": {
      "type": "hex",
      "index": 0,
      "signatureAlgorithm": "ECDSA_P256",
      "hashAlgorithm": "SHA3_256",
      "privateKey": "YOUR PRIVATE KEY"
    }
  }
},
"deployments": {
  "testnet": {
    "testnet-account": [
      "Guestbook"
    ]
  }
}
Paste your address you copied above to where it says “YOUR GENERATED ADDRESS”, and paste your private key where it says “YOUR PRIVATE KEY”.
Deploying
Now we’re ready to deploy! 🚀
Go to your terminal and type:
flow project deploy — network=testnet
We should receive an output stating the contract was deployed successfully:
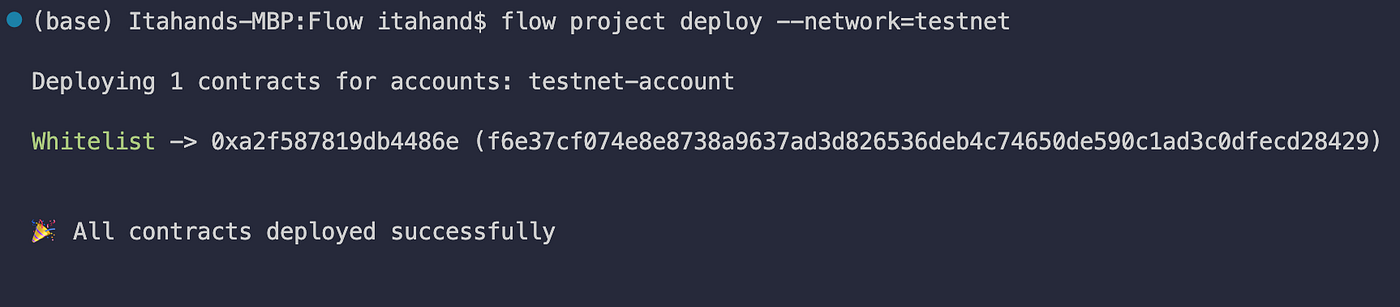
Congratulations on deploying your first smart contract on the Flow network!
It’s important to note here that Cadence smart contracts exist in the storage of the account that deploys them, whereas with Solidity, the smart contract exists at its own address on the blockchain.
Although there are limits to the account’s storage capacity, these are relative to the amount of FLOW tokens reserved in the account. You can learn more about account storage in the Flow Developer Portal.
On my next article we’ll build a simple frontend to interact with our contract.


