


The following article is the first in a series of articles that will help you build a DAO on the Flow network using Cadence.
An initial Coin Offering is a capital-raising mechanism in which emerging crypto-based projects will be able to raise capital from potential investors even before they hit the crypto market.
This is also known by the terms “token offerings” and “token crowdfunding,” which is a win-to-win situation for projects as well as investors. That is, whenever the ICO token value soars, the investors eventually have rewards and a better return on their investment. An initial Coin Offering (ICO) can either be private or public.
In the science of how to create an ICO token for its distribution, it is necessary to establish a smart contract, so asset holders will be able to handle, transfer, sell tokens, and more. In this article, we’ll follow a test-driven development process to create our ICO smart contract with Cadence and Overflow.
What are we testing?
First, we’ll be testing the Admin resource and all of the functions associated with it. Then, we’ll complete the smart contract with the User’s function to purchase tokens. Let’s get to it!
To follow along with this tutorial, you’ll need the following things:
The Flow Command Line Interface (Flow CLI)
Creating our ICO Contract
First, let’s import the contracts that we’re going to need for our ICO.
Then we declare the events. We only need five essential functions.
Then, we can define our only Enum which we use to keep track of a purchase’s state. Below this, we can define our Vault resources; we need one for FUSD which is Flow’s stablecoin, and the token that we’ll use to buy BVT, and one for BVT, of course.
We also declare the path for storing sale resources here
We then declare our variables. This list is a bit longer.
We use the PurchaseInfo struct to store all the information around a purchase, and tickedId to identify it. By creating a Random resource, we can utilize its uuid, which is unique across the whole blockchain, to generate a unique random number for each purchase made.
And lastly, we declare public functions to fetch our ICO’s data from the smart contract and we initiate the contract
This is how the contract looks so far.
Building our Test Suites
Using Overflow, we’re going to test and evaluate our smart contract by running a user story of interactions against the local emulator. If you come from this article, then you already have the minimum requirements to start testing Cadence smart contracts. If not, then you just need to follow these simple steps to get started:
The first thing we’re going to do is create a testing directory with
mkdir blockversity-overflow && cd blockversity-overflow. Then we will initiate the flow environment withflow init.You’ll need to configure your flow.json file with the smart contracts you want to test. To get over it quickly, copy and paste the settings on this repository: https://github.com/Blockversity-xyz/Sample-DAO/blob/main/Cadence/flow.json.
Then we initiate the Go module and install overflow in it. Here’s the example bash code(replace “blockversity/dao-overflow” with your file name):
go mod init blockversity/dao-overflowgo getgithub.com/bjartek/overflow
Then we create a test file called blockVersityPublicSale_test.go, and we import the packages that we’re going to use in it. Just like this:
package main

import (
 "fmt"
 "testing"

 . "github.com/bjartek/overflow"
 "github.com/fatih/color"
 "github.com/stretchr/testify/assert"
)

func TestAdminICO(t *testing.T) {

 o, err := OverflowTesting()
 assert.NoError(t, err)

}
Now, we want to test Cadence scripts and transactions with Overflow to test the functionalities that our Admin resource will have, which are pause/unpause, distribute, refund, updatePrice, updatePersonalCap, withdrawBVT, withdrawFUSD, depositBVT and depositFUSD.
Let’s start with pause and unpause. This is used by the admin to freeze or unfreeze the selling of the token and the way we do this is through a transaction that takes a reference to the Admin resource in your account(if you have it) and utilizes the functions in it. This transaction would look like this:
So to test this, we’re going to define a function that runs this transaction from an emulated Account. If it’s the Admin account it’ll work, and if it isn’t it should panic.
func TestAdminICO(t *testing.T) {

 o, err := OverflowTesting()
 assert.NoError(t, err)

 color.Green("Emulator Account will attempt to pause the sale")
 o.Tx("/BlockVersity/sales/public/admin/pause",
  WithSigner("bob"),
 ).AssertSuccess(t)

 fmt.Println("resultBob")
}
The functions color.Green and fmt.Println are automatically added to your Go imports once you save that file. Of course, when you click on run test you will see the following error and that’s because we haven’t setup any Admin resource in our contract yet.
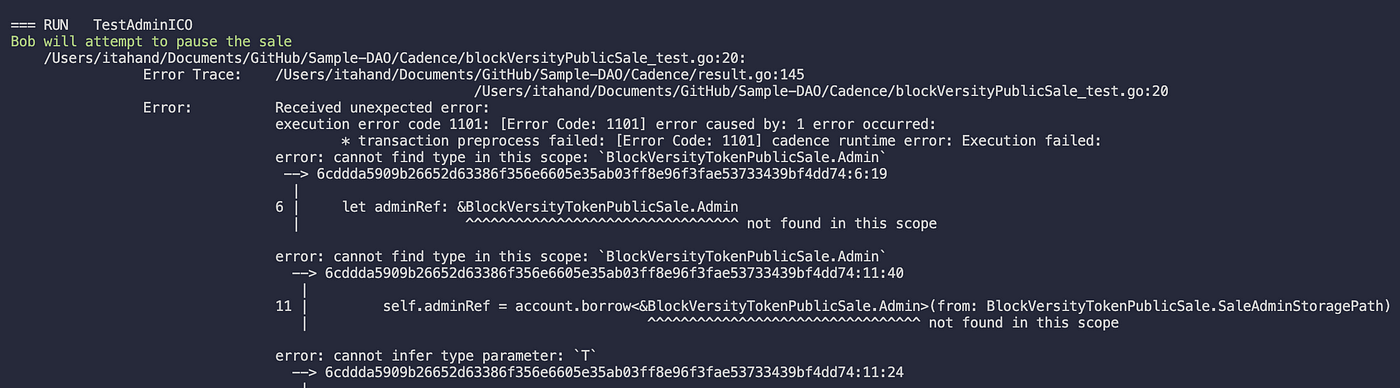
The transaction error tells us that our contract has no Admin resource
So now we’re going to implement the Admin resource in our contract with the pause and unpause functionality. You also need to store this Admin resource inside the account that deploys the contract, and we do this inside our init function.
Now, let’s run our test again!
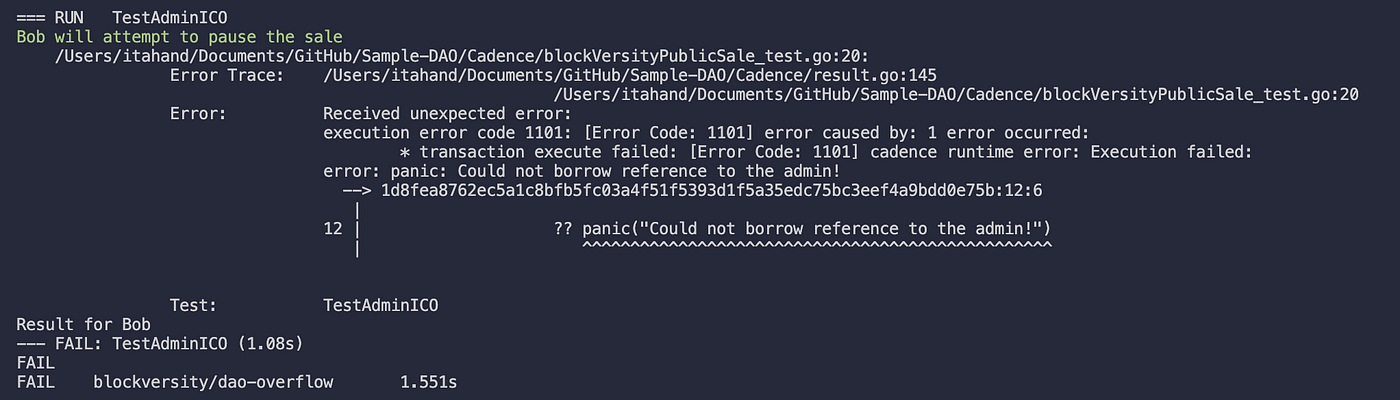
Bob does not hold the Admin resource
Boom! We still get an error, but it’s a different error! This time what happens is that Bob is not the Admin, therefore he can’t pause the sale. Let’s try the same test, but using the emulator-account and let’s change Bob’s transaction to assert.Failure so that Overflow knows we expect it to fail and doesn’t stop our test suite on error. We also need to specify the error message that we expect.
func TestAdminICO(t *testing.T) {

 o, err := OverflowTesting()
 assert.NoError(t, err)

 color.Green("Bob will attempt to pause the sale")
 o.Tx("/BlockVersity/sales/public/admin/pause",
  WithSigner("bob"),
 ).AssertFailure(t, "Could not borrow reference to the admin!")
 fmt.Println("Bob failed to pause the sale")

 color.Green("Admin account will attempt to pause the sale")
 o.Tx("/BlockVersity/sales/public/admin/pause",
  WithSigner("account"),
 ).AssertSuccess(t).Print()

}
And there it is, this time it passes!

Overflow lets us know a transaction was successful with the ‘okay’ emoji
And that’s how you test your contract’s functionality as you build it. To save you time, here’s the code for the full test suite. As you can see, we’re trying to build a user story around the ICO and it requires multiple steps, ending up with the User actually buying our governance token and then receiving the allocated amount after distribution.
Now, we just need to add the all of these functions to our Admin resource and the public purchase function to our ICO smart contract.
Purchase Function
And here’s the completed Admin resource with all of the functions necessary to run the ICO.
Complete Admin resource
If you want to take a look at the transactions and scripts used for testing in this article, you can jump to the BlockVersity public repository and check them out. Once you run the test you should see the story and the result at the end.
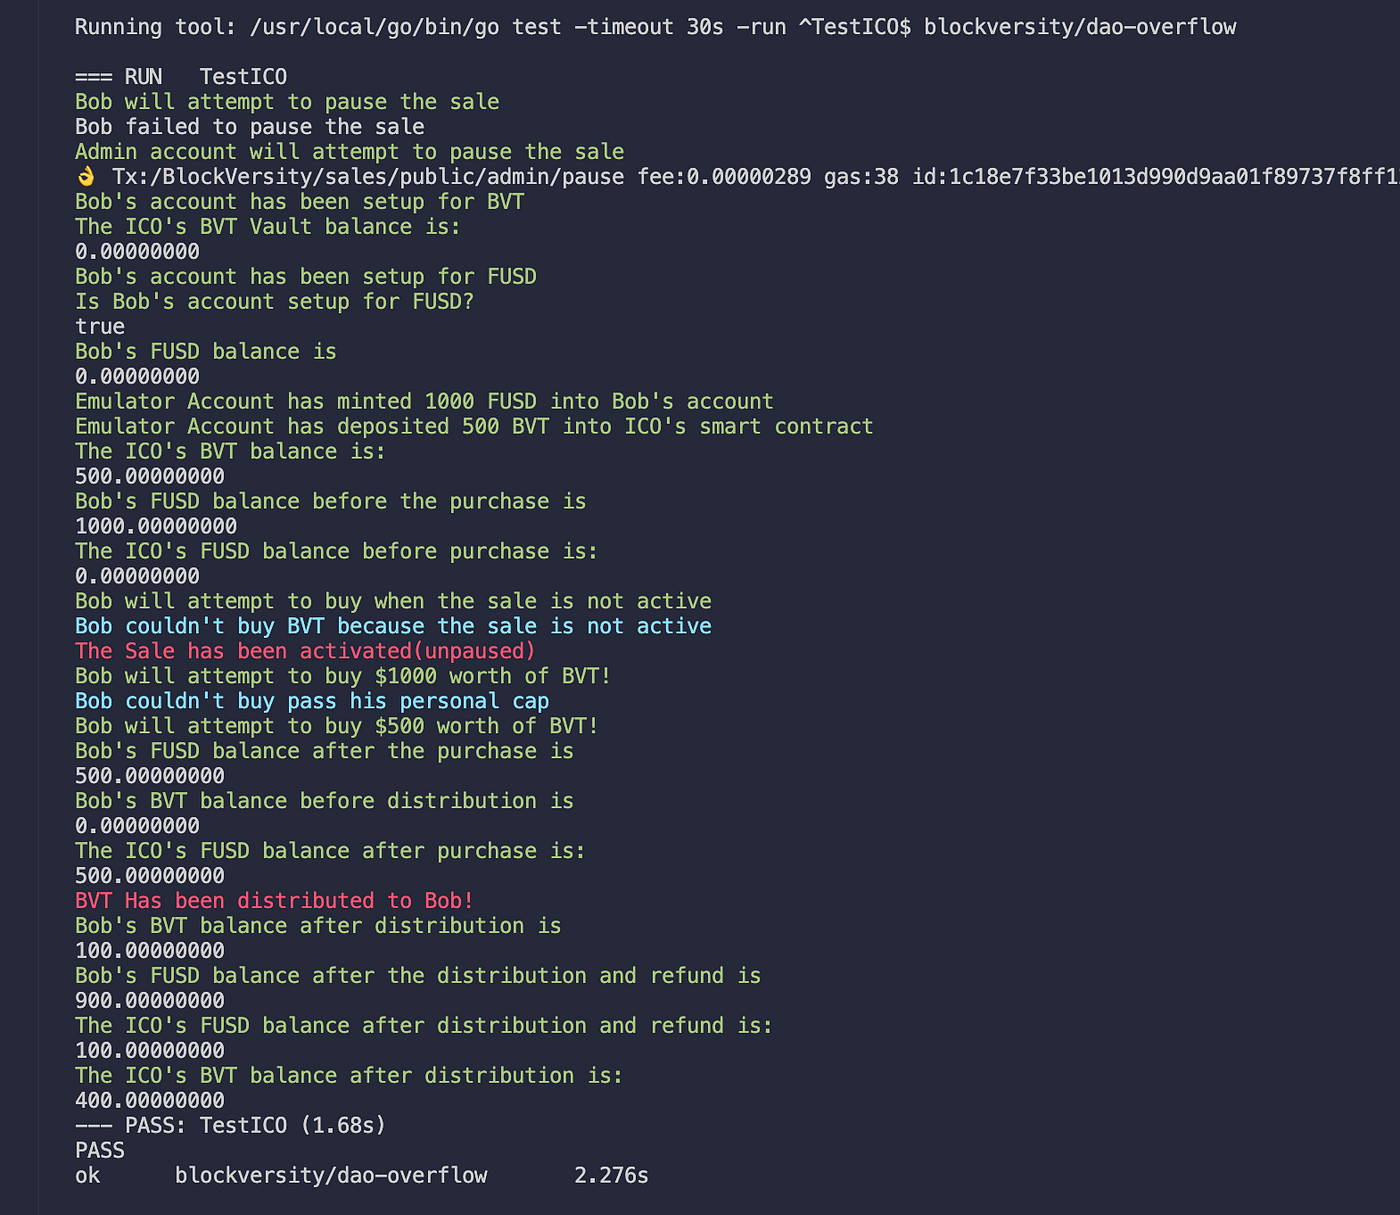
— PASS: TestICO
And that’s it! You’ve run a full story around your ICO using Overflow.